11.22.2013

Blackwork Christmas Tree Pattern

At 31 years old, last week, I purchased my first Christmas tree. 
It was on a great sale from Michaels.  With two kids it felt like it was time to start caring about Christmas. 

With that I've decided to make a ornament each year.  Some day I will be gone and what else will my kids have to remember me by but a box of ornaments they will be obligated to keep in the back of the closet.  They don't even like embroidery, but Mom made them.

So, here is the first:  2013


I've started it and will post when finished  :)

11.20.2013

Sewing: Flannel Blanket tutorial

I found the cutest fabric for Violet's blanket.  She has a few of them, but none are really warm and he loves yarn to death so this was my solution.

Her birthday is tomorrow (!!!)  So I'm calling it an early 2 year birthday present.  

The fabric is flannel from Joann's I got a yard and a half and its the perfect size for a toddler bed/crib.

First I took pics and uploaded it to the blog, always the first step. Duh.

Then washed them.  Prewashing is one of those things that I've never done before but always seems somewhat important.

Then put them together.  You want WRONG SIDES OUT.  You are going to turn it inside out.


Next pin it up.


When its pinned you can start sewing.  Start like half way down the smaller side.  You have to leave enough open room to flip it inside out when the sides are sewn.

Sew it. 

I used this little blue take to tell me where to sew.  I matched up the shorter fabric to that spot.


When you get to a corner sew it at an angle to give you a nice rounded edge.  (If you read my blog you know I don't sew much. 
If I could do it again I would would make this more round.)

But this gives me the opportunity to show you how to do this extra special little trick.

Stop, pop the foot up but leave the needle in the fabric, move the fabric, pop the foot down, sew, pop the foot up, turn the fabric, sew.  

This is what it looks like;


Pop the foot up.


Back down and sew.


Back up and turn.


Back down and sew.


There it is!


I always do this on corners.  So handy.

Don't forget about the space need to flip the blanket inside out. Sew around and flip it.

Next we are going to sew around the edge again.  It will secure it and make it look pretty.  

First iron the edges to make it easier to sew.  When you get to that open space, iron it in so you can close it up.


I did this run a little closer because it isn't the stitch that keeps it together so I didn't have to depend on that.  I wanted to make sure I was running over the excess underneath.  


Done!  The whole thing took about 45 mins.

I asked her if she wanted her new blanket for bed.  She said uh huh!  Never says yes.  Just Uh huh.  I'll take it.

Happy Birthday Turtle!


11.18.2013

Purple Giraffes

Cutest. Fabric. Ever.

Ever since my buddy Gail made Wes that gorgeous geometric blanket I have wanted to make a similar one for Violet.  It's flannel because it's cold in her room and she tends to tear yarn apart because she loves it so.

She just saw a ton of colors so I picked it out for her.  ;)

I can't wait to get started on this.  (Cause you know, I have nothing else to do!)  :D


11.15.2013

ArtBar Show, featuring everyone!

Our local watering hole.  Two Brother's Roundhouse is kind enough to let all us artist types in for a little show on the first Friday of each month.

December (6th) the theme is 6by6.  My piece geometry piece was selected to be the poster art.  :)  

You can see these all over Downtown Aurora.

You should come, it'll be fun.  

 Oh, and buy stuff.  Everything showing is for sale!

11.12.2013

Tutorial on a Tuesday: Butttons.

Alllriiigght.  

Buttons.

This is how I make my buttons.  I've done maybe 5 now and they aren't easy and I was doing them pretty blindly so I want to show you how I do them.  It's not going to be the prettiest thing you ever saw from the back, but it works.  

FIRST.

Stitch something.


Then pick up some buttons, they look like this.


You want the one that says "kit" cause they have the little pushers with them.  The others will say "refill"  (the back gives directions on using the pushers).

I picked up these today. 


Best. Idea. Ever.  Trying to figure out how much would be on the the actual button and how much would fold was very awkward.  These make a few things more simple.  Basically, it tells you the size of the button, the inside size that will show and the outside size you need to cut to.  Seriously, but it.

Materials - 
Add double sided tape and some scissors to this list.


Again, this is how I do this.  Take it or leave it...

The back of your buttons are going to have a loop, so they can be used as a button. 

Take it off.  Some pliers to pry it off. 


Next, cut the stitch into the round shape you need.  You can use the template.  In fact, do it, use the template. 

Use a little piece of double sided tape to hold this down.  You are going to start folding and it's going to move when you don't want it to.  The tape is very helpful.


Next, use the template to make sure that you have your image centered. 


When you do, start folding the sides around.  This is the tricky part.  The cloth is thick, and the buttons aren't really made for such thick cloth.  So use the little pusher thing, and use it to smash down the edges and flatter them out.  Like this. 


Next put some poxy on the metal part that is still showing.  The heart button shown in my last post fell apart a couple hours after it had been on the kids coat.  You don't want the back to unattach.

Then put on the back.

The kit is going to tell you to use this stuff.  I say skip it.  Because of the fabric.  


Instead...


You are going to need to bent it a bit to get it snug.  The e6000 will do the rest. 

Speaking of, put some more on. 


Then put on the pin back.  Purchased for a couple bucks at Hobby Lobby.  Worth it. 


And then.  BAM!

This one is a gift for a friend.  I hope she likes it.  :) 

11.11.2013

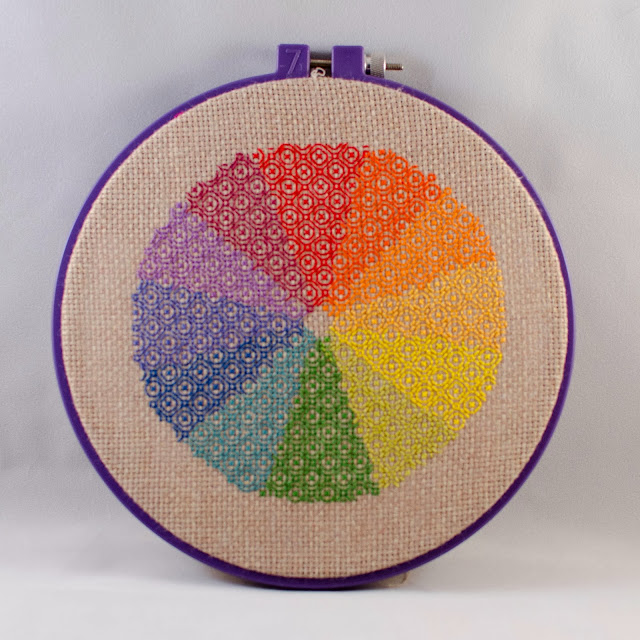
My Color Wheel - or - what is Blackwork?

I love color wheels.  And I love embroidery more than I love cross stitch (shhhh...don't tell anyone).

I made this this week.


The hardest part was deciding what pattern to use.  It's faster, and more satisfying than cross stitch.  It reminds me of crochet, as it's just enough brain power to feel accomplished and creative.  But still really relaxing   It feels natural, no real counting. 

Check out my Blackwork Board on Pinterest for a bunch of patterns.

Specs:

14 pt cloth I found at a thrift for 90 cents. SCORE.

Red - 817
Red Orange - 607
Orange - 740
Yellow Orange - 396
Yellow - 444
Yellow Green - 166
Green - 826
Blue Green - 3848
Blue - 3842
Blue Violet - AKA my new most favorite color EVA! - 792
Violet - 208
Red Violet - 3803

Try it out.  You will enjoy it.

Also, check out one of my favorite blogs, &Stitches, for some more info on the technique and a stitch along :)


11.10.2013

Lil Cross Stitch Buttons. Wheeeee!

I have been knocking out little projects and working on larger ones.  I made a list yesterday, I have 14.  Not including the things still in my head.  I'm gunna need a nanny. 

I've been cross stitching for about 3 months and I'm ready to expand.  I like working with the smaller project.  It's really satisfying to complete something nearly daily and be much more portable.  An afghan can take months and it's going to sit in the same spot for a while. 

First was these...


Which I LOVE.  The colors are perfect.  I made them into earrings but they felt weird and I don't have the guts to wear them. So I'm going to rip off the earring back and make them buttons also. 

But I'm wearing them everydamnwhere.

Then this - 
I experimented with an idea I saw on Pinterest.  I LOVE this. 


I buttoned it and threw it on my pea coat.

Then I did a heart and a skull.

These are just something cute for Violet's coat.

The skull is done in Kreinik Metallics.  This stuff is great.  I have a huge assortment of colors to play with.  :D


She loves skulls and monsters.  She calls them "rawrs". 

The buttons are 7/8" and 1".  They have a few different sizes and I'm mos def going to be making more.  I love me some buttons. 

I'm planning a tutorial for the buttons.  That is.  If you want one...