Showing posts with label How To. Show all posts

2.22.2014

Free Pattern: Peter Pan Collar


I've been working on moving this blog to a wordpress site. It's been relatively easy (my husband is a Software Engineer). The only thing I'm nervous about is the About me section and photo. I wanted to make a collar to wear in the photo. Somehow I think it might just exquisitely capture my essence.  

Har.

So here is how I made it.  


Traditional Peter Pan Collar
Size: Adult
Length: 19”

Skill Level: Beginner/Intermediate

Materials

Caron Simply Soft Yarn.
(I used Blue Mint)
G/4.00mm Crochet Hook
Darting Needle to sew in ends

Knowledge needed

Chain (ch)
Half Double Crochet (hdc)
Single Crochet decrease (scdec)
Repeat (rep)


Chain 82 + 2 turning chain
Feel free to add increase the number of stitch, but make sure it stays an even number.

Row 1: HDC in each ch stitch across. (82 stitches)

Row 2: Ch2, complete an scdec in the first two hdc stitches, *hdc in the next two stitches, 2hdc in the next*. rep* to* until there are 2 stitches left.  Complete an scdec in the last 2 stitches.  (104 stitches)

Row 3: Ch2, complete an scdec in the first two hdc stitches, hdc in each stitch until there are 2 stitches left.  Complete an scdec in the last 2 stitches. (100 stitches)

Row 4: Ch2, complete an scdec in the first two hdc stitches, *hdc in the next five stitches, 2hdc in the next*. rep* to* until there are 2 stitches left.  (116 stitches)

Logic: A slight increasing rows will help to form a soft roundness to your collar and decreasing the ends will give a curve instead of a straight edge.  If you like the look of a pointed collar, instead of decreasing, hdc over those stitches instead.  

Please don't hesitate to comment below to let me know if you have any questions of need clarification! You can also comment if you like the pattern. ;)

Finishing

I didn't explain how to finish the collar cause there are a ton of different ways.  


Sew it directly onto the top or dress you are planning to wear it with.  I love this look, however, the red dress is on Betty cause It doesn't fit me.  :)


A pin.  This is a cross stitch pin I made for Violet's jacket.  It's a simple pin back and can be replaced and switched out very easily.


A bow.  Cause awwww.


Something else crocheted.  This little bow really does the trick, but you can always use a heart or a skull or whatever you can think of. 


Finally, a button.  :)


1.28.2014

Free Valentine's Embroidery Pattern

As a thanks to everyone that drops by my little place on the internet, I want you to know I really super heart you.

Here, have a free embroidery pattern.  :)  I hope you like it!  Please go Craftsy to download the pdf.  It is about 5.5 by 5.5 inches, and made to fit nicely in a 6 inch hoop.

Please, let me know what your plan is for the pattern in the comments section.  Cause I'm nosy :)
I'm not sure where mine will go yet.  It will liking move around the house.  Many of my things tend to do that.  I like to reorganize.  I'm a fan of change.

While you are at it.  Poke around the other Craftsy patterns.  There is a lot of good stuff in there, and a lot of people don't even know its there.


I stitched it up in two nights using a simple backstitch and one strand of floss.  I rather like it.  :)


I decided to crochet border to add a bit to the finished product.

If you would like to do the same, I used this tutorial as a reference. And decided to record myself doing it because it can be a bit awkward at first.

1.09.2014

Stitch from Scratch Ep. 2.2 Materials: Floss and Needles

Let's get to it!

Floss and/or Thread


These words are used somewhat interchangeably. I grew up saying floss and that's what DMC calls it. When I think of thread I think of sewing. I normally use DMC but I also have a bunch of Krieink that I absolutely love.  Of course, there are many other brands.  Look around and just pick the colors you love.


The important thing to know about DMC floss is that you don't use the whole thing. It's actually 6 strands in one skein.

For a typical project you will use 14 ct cloth and 1 strand of floss that you will halve so that it becomes two.  I will show you this in the video at the end of this page.

The number of strands you want to you is really up to you.  Sometimes I want a more pronounced stitch, in which case I will use 3.  As a DMC Mentor, I will tell you that in general and typically you will use 2.

You will buy the skein and wrap it around a bobbin and likely put it in a plastic case like I have above.

I like to organize my thread based on color.  DMC has over 400 colors and types.  The numbers and the colors don't really go in an observable order but they do have this.....


Above: The number of the floss and the corresponding column.
Below:  The column sorted by color family.


 I use this tool to keep track of the colors I have and the ones I still need to pick up.


So pretty!!!  I've got a whole case of these.  :D


Kreinik a braided strand.  You don't separate them to use them.  In the second photo you can see there are actually many different braid sizes.  There are still more than I have here.  The size depends on your project. 


Needles

As I said in the last post all you need is a needle to get started.  This is true but there are specific needles for specific size cloth, if you want to get technical.

This site says it better than I ever could - http://www.crossstitchneedleshop.co.uk/needlesizeguide.html

For comparison...


There is a lot of information just on the packages.  They will say the size and generally what the size is used for.  I had no idea there was so much variation in needles sizes until very recently.

I used an old sewing needle until 5 weeks ago.
I know. Oops. Now I use my smallest needle always.  I realized I was stretching the hole in the fabric. Once I realized it, it's one of those things that I couldn't unsee. So now I kinda play it safe.

And now my very very first video on how to pull strands apart and thread a needle.

Don't bother with your volume, there no audio.  :)


Tell me, which thread do you like?

You can see previous episodes here -

Calendar
1.1 Credentials and History
2.1 Materials : Cloth


12.30.2013

Learn to Cross Stitch!

Over the next couple months I will be releasing a How To series called "Stitch From Scratch".  Learn to cross stitch step by step.  Including videos and photos!

If you have ever wanted to learn, here you go :)


  1. History of Cross Stitch and My Credentials  [Release: Jan 3]
  2. Materials
    1. Cloth  [Release: Jan 3]
    2. Thread or "Floss"    [Release: Jan 10]
    3. Needles and Hoops    [Release: Jan 17]
    4. How to Read a Pattern    [Release: Jan 24]
  3. How to Cross Stitch
    1. Beginning, Stitching and Ending thread    [Release: Feb 7]
    2. Half Stitches    [Release: Feb 14]
    3. Blackwork    [Release: Feb 21]
  4. Patterns
    1. How to create a pattern in Photoshop    [Release: Feb 28]
    2. Free pattern to try    [Release: March 7]
Follow me in facebook, twitter or bloglovin to get updates when I post.  :)

Stay tuned for Friday!
-Teresa

11.20.2013

Sewing: Flannel Blanket tutorial

I found the cutest fabric for Violet's blanket.  She has a few of them, but none are really warm and he loves yarn to death so this was my solution.

Her birthday is tomorrow (!!!)  So I'm calling it an early 2 year birthday present.  

The fabric is flannel from Joann's I got a yard and a half and its the perfect size for a toddler bed/crib.

First I took pics and uploaded it to the blog, always the first step. Duh.

Then washed them.  Prewashing is one of those things that I've never done before but always seems somewhat important.

Then put them together.  You want WRONG SIDES OUT.  You are going to turn it inside out.


Next pin it up.


When its pinned you can start sewing.  Start like half way down the smaller side.  You have to leave enough open room to flip it inside out when the sides are sewn.

Sew it. 

I used this little blue take to tell me where to sew.  I matched up the shorter fabric to that spot.


When you get to a corner sew it at an angle to give you a nice rounded edge.  (If you read my blog you know I don't sew much. 
If I could do it again I would would make this more round.)

But this gives me the opportunity to show you how to do this extra special little trick.

Stop, pop the foot up but leave the needle in the fabric, move the fabric, pop the foot down, sew, pop the foot up, turn the fabric, sew.  

This is what it looks like;


Pop the foot up.


Back down and sew.


Back up and turn.


Back down and sew.


There it is!


I always do this on corners.  So handy.

Don't forget about the space need to flip the blanket inside out. Sew around and flip it.

Next we are going to sew around the edge again.  It will secure it and make it look pretty.  

First iron the edges to make it easier to sew.  When you get to that open space, iron it in so you can close it up.


I did this run a little closer because it isn't the stitch that keeps it together so I didn't have to depend on that.  I wanted to make sure I was running over the excess underneath.  


Done!  The whole thing took about 45 mins.

I asked her if she wanted her new blanket for bed.  She said uh huh!  Never says yes.  Just Uh huh.  I'll take it.

Happy Birthday Turtle!


11.12.2013

Tutorial on a Tuesday: Butttons.

Alllriiigght.  

Buttons.

This is how I make my buttons.  I've done maybe 5 now and they aren't easy and I was doing them pretty blindly so I want to show you how I do them.  It's not going to be the prettiest thing you ever saw from the back, but it works.  

FIRST.

Stitch something.


Then pick up some buttons, they look like this.


You want the one that says "kit" cause they have the little pushers with them.  The others will say "refill"  (the back gives directions on using the pushers).

I picked up these today. 


Best. Idea. Ever.  Trying to figure out how much would be on the the actual button and how much would fold was very awkward.  These make a few things more simple.  Basically, it tells you the size of the button, the inside size that will show and the outside size you need to cut to.  Seriously, but it.

Materials - 
Add double sided tape and some scissors to this list.


Again, this is how I do this.  Take it or leave it...

The back of your buttons are going to have a loop, so they can be used as a button. 

Take it off.  Some pliers to pry it off. 


Next, cut the stitch into the round shape you need.  You can use the template.  In fact, do it, use the template. 

Use a little piece of double sided tape to hold this down.  You are going to start folding and it's going to move when you don't want it to.  The tape is very helpful.


Next, use the template to make sure that you have your image centered. 


When you do, start folding the sides around.  This is the tricky part.  The cloth is thick, and the buttons aren't really made for such thick cloth.  So use the little pusher thing, and use it to smash down the edges and flatter them out.  Like this. 


Next put some poxy on the metal part that is still showing.  The heart button shown in my last post fell apart a couple hours after it had been on the kids coat.  You don't want the back to unattach.

Then put on the back.

The kit is going to tell you to use this stuff.  I say skip it.  Because of the fabric.  


Instead...


You are going to need to bent it a bit to get it snug.  The e6000 will do the rest. 

Speaking of, put some more on. 


Then put on the pin back.  Purchased for a couple bucks at Hobby Lobby.  Worth it. 


And then.  BAM!

This one is a gift for a friend.  I hope she likes it.  :) 

8.11.2013

Bow Pattern, Now For Sale!!!

Hi everyone!  It's finally complete.  My sweet little bow is now for sale.  Please head over to Ravelry to purchase a copy.

You will be able to make this dainty little guy.  I love this bow.  It's something that took me many of my newly acquired crochet skills to complete.  


I'll also be making about 12 of these to sell at Alley (ART) Fest.  If you don't crochet you can pick on up there.  ;)  OR, just lemme know and I can make you one custom.   A completed necklace will be $25.  I accept cash, paypal, Visa, mastercard, discover and AmEx.  And, of course, craft trade.  :D

I really just hope you think it's as cute as I think it is.  

Thank you!

8.02.2013

First Friday Free Pattern: Simple Modern Afghan

I love Mod.  The fashion, the hair, the lines, the structure, the colors.  Yum.  As a crocheter I see a lot of pretty flowery or complicated color worked afghans.  Don't get me wrong.  Its nice.  I love me an good doily.    But I just want something simple and interesting.  I hate variegated yarn.  I love neutral and neon.

I have a smallish Tiffany blue velvet love seat in my living room.  A love seat needs an afghan.  I decided on gray on gray.  But I still wish I had used lime.  I first made a baby blanket with this design.  I call it Pear Creamsicle. <333  (it's for sale....)


Materials
Measureing Tape
K hook
Darting Needle
Worsted Weight yarn


  • 2 skeins of color 1 (Hobby Lobby's I love this Yarn in Graphite)
  • 1 skein of color 2 ( Hobby Lobby's I love this Yarn in Lt. Gray)

Let me explain this huge hook.  This stitch is very simple and creates a beautiful texture.  You can use a smaller hook, very easily, but I like to use the bigger one to make it less heavy and more soft.  It's like there is more air in the stitch. Cause, well, there is.

Stitches
hdc - Half Doublt Crochet
dc - Double Crochet
ch- Chain
sk ch - skip one chain stitch
ch sp - chain space
( ) - this means to do all the stitches into one space or stitch

Techniques
changing colors

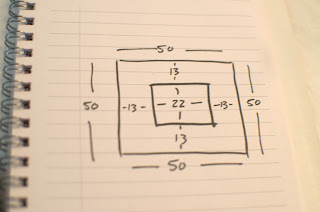
Firstly, I decided how big I want this blanket.  The baby one above is 35"x35".  The small afghan below is 50"x50".  You will need to figure out how big you want the inner square.  It's simple math really and then paying some attention as you go.  (I do see that this doesn't match up to 50.  It's really just an about 13 and about 22 and even about 50. Because the hook is so big it will stretch.)


I choose this odd size because I love anything square and it's the right size for my Tiffany Blue Velvet love seat in our sitting room. 

The stitch is called a Rope Stitch.  I'm sure you would be able to find it online.  I've seen it in a few different places.  If you happen to have the Crochet Stitch Bible it's page 74.  :)

Begin by chaining multiples of 3 until you have reached the desired length.  The following pattern is what I did to make my "Gray Squared Lover's" afghan.  (I like to name things.) 

Row 1 - Ch 135 + 3 for turning chain.  

Row 2 - dc into the 4th ch from the hook.  *ch1, dc in next ch, sk ch, dc in next ch* Rep*to * until the last ch sp and dc into that last ch sp. Turn your work. 

Row 3 - Ch3, *(dc,ch1,dc) into the ch-1 sp* Rep* to * until all spaces are completes.  dc into the ch-3 space of the turning chain. Turn your work.

FYI - This is called a "rope stitch".  

Row 4 to 18 - Repeat Row 3

Row 19 - Ch3, *(dc,ch1,dc) in the ch-1 sp* for the next 11 ch-1 spaces.  Change from color 1 to 2 between the 11th and 12th spaces.  Continue.  Change from color 2 to 1 between the 32nd and 33rd space. Continue until the end. dc into ch-3 space.  Turn.

*Tip* I used two skeins for two colors.  You can use three is it makes it easier, and it might.  I didn't cut the middle color at all, but carried it up.  The outside color needs to be cut so that you can connect it to the other end.  Leave at least 4 inches so you can sew it in really tight, if one of these comes loose its going to be a pain to fix. 

In theory you can carry the dark color over the light color but you are going to waste a lot of yarn and it makes it hard to hold onto cause it bunches all up.  

This is a little odd at first but you will get used to have two skeins going at once.  When I cut I didn't crochet on top of the cut yarn because I knew I was going to be sewing it in later anyway, so I didn't bother, plus this way I can pull it a bit tighter to make sure that the stitch matches well.

Row 20 to 36 - Repeat row 10.

Row 37 to 55 - Repeat row 3.

Finish off after Row 55.  

Your blanket is complete.  :)

The last thing you will do is tie in the million little 

Border:  (if you so choose to do a border)

It's just half double crochet all the way around.  
Start in the center of the last row, attach and chain 2, half double crochet twice in each space until the corner. 4 hdc in the corner. Continue with three hdcs in each space for the sides.  4 hdc in the corner. Continue around, join and finish off.

This blanket has become our favorite morning cartoon snuggle blanket.  Its soft, comfy and not too warm.


If you use it, here is the pattern on Ravelry and Pinterest