Recently my color wheel has gotten some attention. (Thanks DMC Blog!) I still plan to make this at some point. It's just too big and requires time to get the colors just right. If the colors aren't just right, I won't make it. This smaller color wheel is exactly right. I love these colors and I'm very proud of this little guy.
This was originally going to be C for Color Wheel, but because the colors are so true my Art School Husband explained that these are really just hues. Primary and secondary. After some more investigation I learned that this is what is called additive color. The traditional artists paint palate and what we learned as kids. Blue/Yellow/Red. The more colors you add, the darker it gets. See the black middle. The other type is used with light, like monitors and television sets. It's called Subtractive color. The more colors you add the lighter it gets. Hense, the white middle. Interesting huh? Anyway, here is the pattern. I hope you enjoy it as much as I did. Red - 666 Yellow - 307 Blue - 710 Orange - 740 Green - 909 Purple - 550 Black - 3799 Lettering - 3799
One more note - I'm sure you noticed I didn't use black for black. I used the darkest gray. This is because I feel like the black (310) is thin. Maybe it's just me. But I feel like I can see more white when I use it. I wanted this to be very rich. Just my preference :) Comment for a PDF. :)
As I'm sure you have noticed the last month or so I've been heavy into cross stitch. Embroidery was my first fiber art love so it's not a huge stretch. I'm also a design nerd (with very little formal training). Maybe I'm a just a girl that knows what she like to look at. I've been really enjoying playing with my knowledge of Photoshop and making a few cross stitch patterns. I know now that there isn't a software that is correct for what I want to do and there isn't a website with a huge selection of patterns and ideas like there is with yarn (Ravelry). I've learned so many new things and ways of things playing with this craft. That's why we craft isn't it? That all said I've been wanted to get a color wheel at my desk for a long time. I work a lot with color in many different ways and decided cross stitch was the way to make an interesting one. So here it is. Cross stitch color wheel.
It is made to be 6x6 on 14pt cloth to fit an 8x8 frame. I haven't started it yet, I need some colors. I'll update with suggested colors when I know. Until then.... Stitch on, stitcheroos!
The girl meaning me. Cupcakes became Violet's "thing" before she was born. This onesie from Carters I bought in nb, 3,6,9 and 12 because I really just wanted to see it ALLTHETIME. It's it cute?!? It says momma's sweetie.
I'm doing more cross stitching because it's giving me the ability to create smaller more design driven projects. This is the second thing I made. It's for Violet's gallery wall and it's her "full" nickname from me. We call her Squirt, Turtle, Chicken, Chick, Doll, Doll Face and whatever else. This just came out of my mouth one day.
This was done on 14pt Adia Cloth. It took about 2-3 hours or so. And was a really good practice. I got the pattern on Pinterest. The 5x7 frame from IKEA. It's been laying around for a while and I think it was a set of 4 for $2.50. Plexiglas, which I like for a kids room. And card stock cut in the shape of a mat.
If I have learned anything in my last couple years of crocheting and crafting it's that people love them some owls. As it is Sunday, Jeff is home so he is helping me chase our little monster around the house. I tagged him in and I hopped on Ravelry looking for an idea for something completely different. Violet is starting to pick thing up and "collect" them. Rocks and things. And by collect I mean she brings them to me to hold onto. On a whim I made her this little purse to collect her treasures. It took about 30-45 mins. I took it apart once and started over so I'm not sure exactly. The pattern isn't mine. It's here.
She loves anything made of yarn. Especially anything that she can point out it's eyes and nose. My chicken is getting TOO big!
I'm going to get this right. I finally got enough sleep that I could make a simple one dip chevron pattern. Don't ask me why that was so difficult.
I picked up a couple more Aunt Lydia's Crochet Thread. I've got the gray and now the warm teal and plum. From the Fashion 3 collections.
Also, I'm currently experimenting with the photographic lighting. We are in the basement for another few weeks. So I will soon be able to take MUCH better photos. Please excuse this for now. If I'm still taking horrible toned photos in a month, call me out.
I want to participate in the crafty shows we have going on around town and I think that these little guys would make cute necklaces.
Here's my super complicated Chevron pattern that took me days to figure out. (sigh)
Ch13 plus 3 for the first DC turn and dc into the 13th ch dc into the next 4 ch dc decrease over the next 3 chains dc into the next 4 ch 2 dc into the last ch
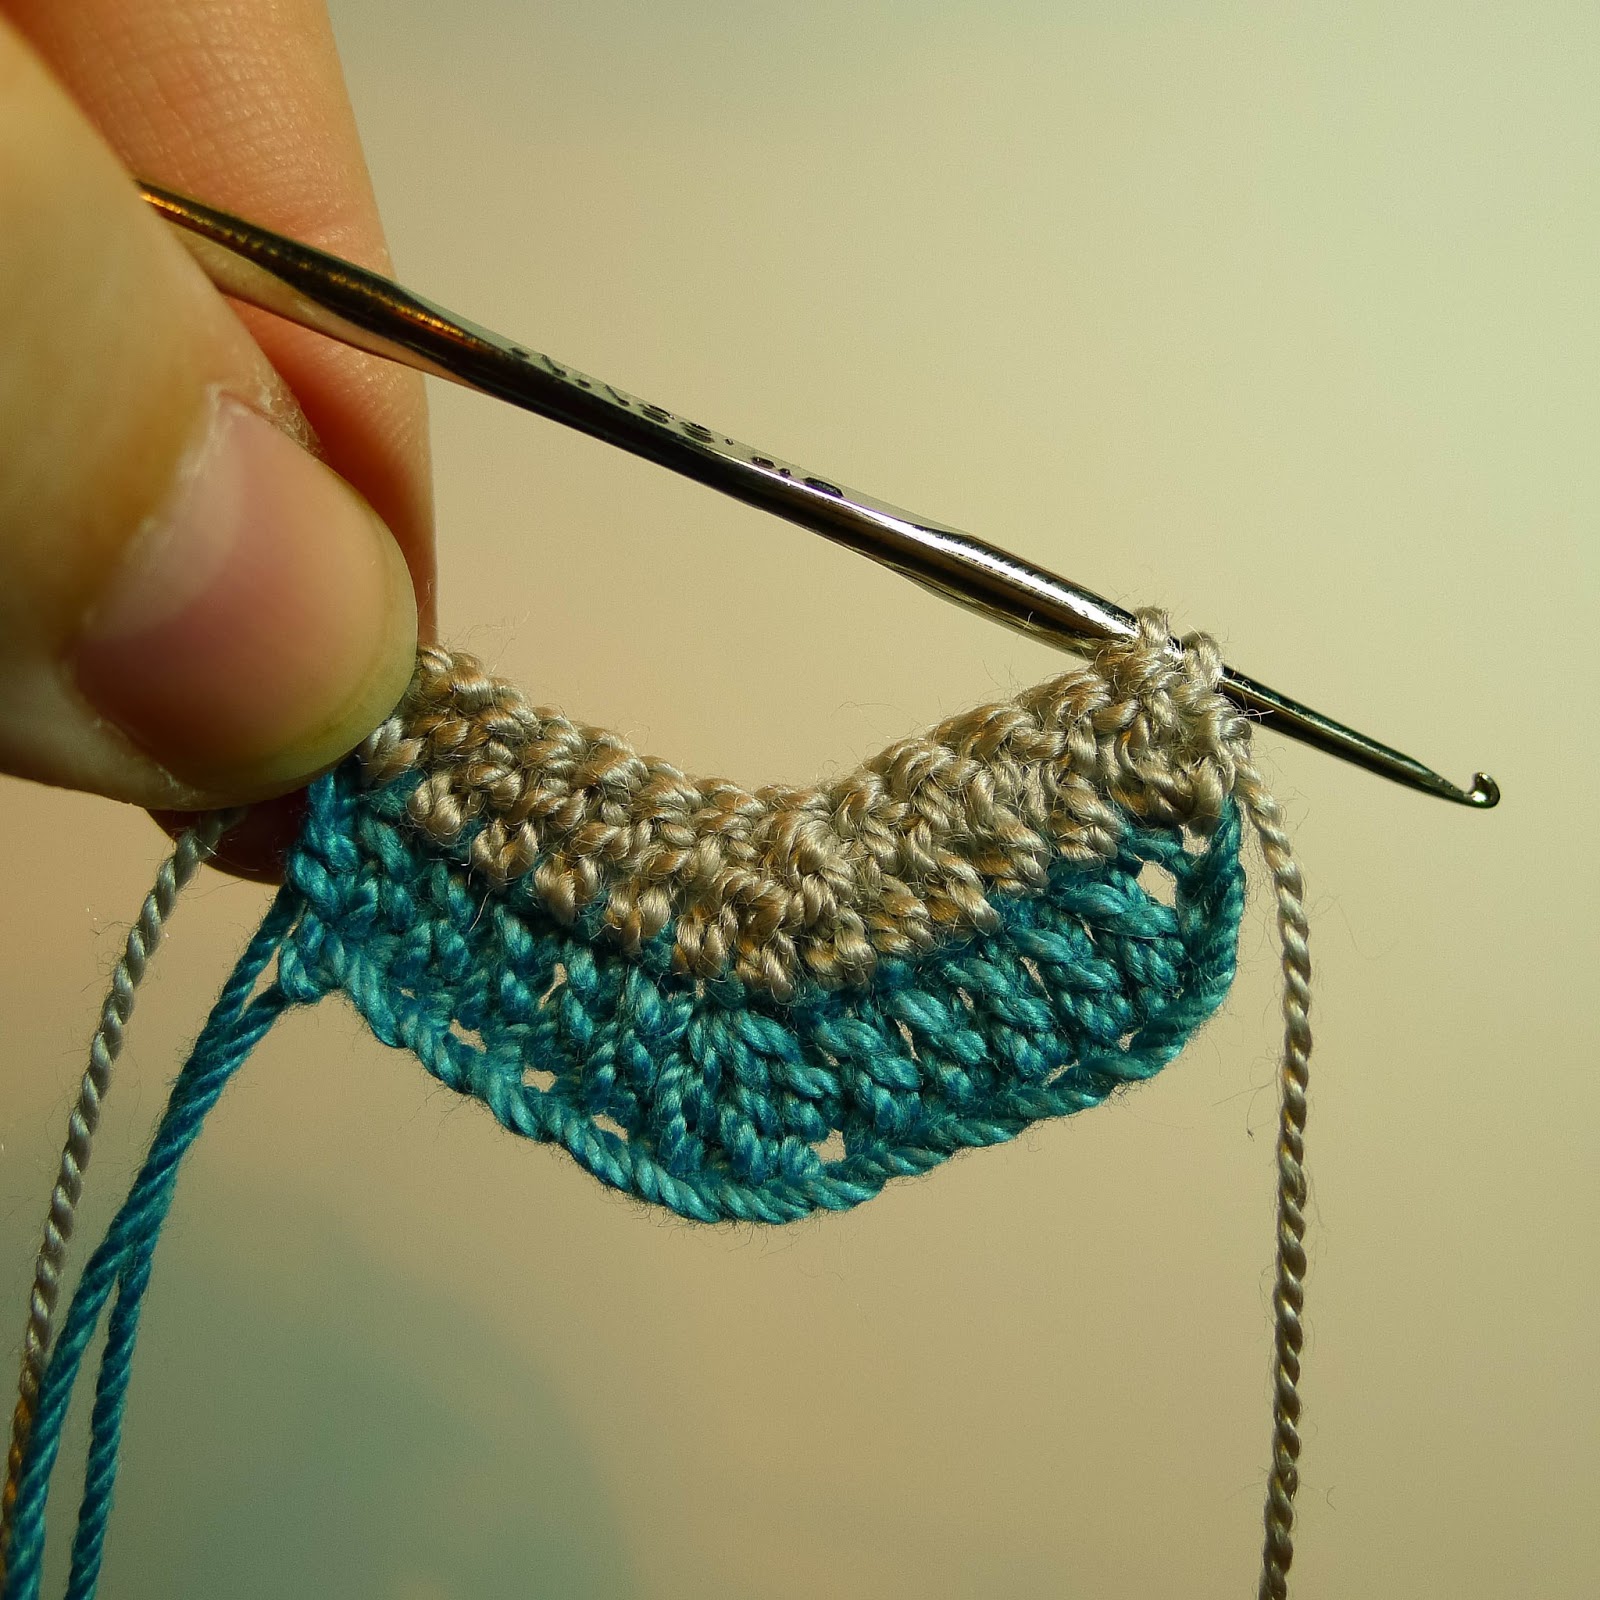
Here I still have the second half of the dc on my hook because I'm going to switch colors.
Switched.
Do the same thing as the first row. Ch3 and dc into the same stitch as the ch3 (increase) dc into the next 4 dc dc decrease over the next 3 dc dc into the next 4 dc 2 dc into the last dc (increase)
You are increasing on the ends because we need to make up some of the stitches we are losing when we decrease in the center. It makes the shape a nice "V" and still gives a nice flat side.
Switch colors and repeat this row.
You can do this forever. I decided to stop here. I sewed in my ends. I felt like I could have more control over the tension of the edges if I sewed them all in instead of carrying over.
Looks a little wonky, huh? As a larger project these curves are just fine. It's often the beauty of crochet. But this is a small lil thing and I want it to be perfect. At this point I'm going to stretch it a bit and pin it to a piece of cardboard. Then blot it with some Mod Podge.
I found this pattern. Then I decided it worked but could be better. I wont link it just because I don't want to say that this particular pattern is bad. Its just not exactly what I was looking for. So, I wanted to make it what I was looking for. I'm not a big fan of math. So when I realized that I was about to embark on the most math intensive project of my life I was a little hesitant. The problem is that you don't know if it works or not until you are done. Until the last stitch. It took me about 4 hour to break it down. I realized that the pattern is 4. There needs to be a multiple of 5 double crochet. To get a multiple of 4 loops. But there is a turning chain so that makes one less chain than there will be double crochet. BUT to make the side symmetrical you have to put 3 double crochet (or two loops) in the same stitch. Then you have to have three rows of dc on the bottom layer, 2 in the middle and one on the top. Yeah.
So this is basically my pattern... Bottom Layer 1 - ch 20 2-4 - ch2, dc into 2nd ch from hook and dc across (21) 5 - ch5, dc in same st as the ch *ch3, dc in next* rep 19 times. Ch3 and dc into the same stitch to create 21st loop in the same stitch as the 20th looop. (do not use turning chain) 6 - ch3, *tr,ch,tr,tr,tr,ch,tr, (Into first loop) ch3, sk loop, sc into the next loop, ch3* Repeat * to * until the last loop. tr,ch,tr,tr,tr,ch,tr, ch3 (into the last loop) sl and tie off Middle layer
1 - ch 16 2-3 - ch2, dc into 2nd ch from hook and dc across (17) 4 - ch5, dc in same st as the ch *ch3, dc in next* rep 19 times. Ch3 and dc into the same stitch to create 21st loop in the same stitch as the 20th looop. (do not use turning chain) 5 - ch3, *tr,ch,tr,tr,tr,ch,tr, (Into first loop) ch3, sk loop, sc into the next loop, ch3* Repeat * to * until the last loop. tr,ch,tr,tr,tr,ch,tr, ch3 (into the last loop) sl and tie off
Top layer 1 - ch 12 2-3 - ch2, dc into 2nd ch from hook and dc across (13) 4 - ch5, dc in same st as the ch *ch3, dc in next* rep 19 times. Ch3 and dc into the same stitch to create 21st loop in the same stitch as the 20th looop. (do not use turning chain) 5 - ch3, *tr,ch,tr,tr,tr,ch,tr, (Into first loop) ch3, sk loop, sc into the next loop, ch3* Repeat * to * until the last loop. tr,ch,tr,tr,tr,ch,tr, ch3 (into the last loop) sl and tie off Then I added the chain. Use the left most and right most chain stitch the attach the chain. WHEW. Do you like it? :)
Been working too hard to even update this! And on too many *secret* things :)
Today I have for you an accident. I made a fu manchu while trying to make a curly mustache. Opps and yay.
Its easy. Just one row;
Ch 20
sl into the second ch from the hook.
then do this....
sl, sl, sc, hdc, dc, tr, dc, 2hdc, sl, 2hdc, dc, tr, dc, hdc, sc, sl, sl, sl
Tie off and sew in.
One of the easiest things I've found to make are coffee cup cozies. There is no real necessity for them, but they feel so nice. Hot Chocolate is THAT much better with one. It's like a glove for your mug. You know you want one. I've got a pattern for a handle-less mug, but I really like this one I found tonight of a handle mug. This is the original pattern I used. Very cute site, check it out. I tend to use the pattern, then take it out and modify it. The way this is written works very well. I changed it for the yarn I was using and because I wanted a more bulky feel but tighter fitting. Also, I don't have any cute buttons and I'm impatient so I had to make it without them :)
I love this shell stitch. Its simple and much more interesting to look at than sc,sc,sc,sc,sc ugh. Here is my pattern taken from the site and modified... Let me know if I can help you with any questions at all! :) Materials: Worsted weight yarn, preferably something easily washable Size J hook
Instructions: Row 1- Ch 4, and SlSt into beginning chain to create a loop. Ch 2, (counts as a DC), and then make 11 DC in the loop, join to the top of the CH 2. (12)
Row 2- Ch 2, make a DC in same stitch as the CH 2 just made, then make 2 DC in each stitch around, join to top of chain 2. (24)
Row 4- Ch 1, make 1 SC in front loops only in each stitch all the way around, join. (24)
Row 5- Ch 1, (make 1 SC and 1 DC both in the same next stitch, skip next stitch), repeat parenthesis all the way around until 3 stitches are left unworked. 1 SC in the next stitch. Chain 1 and turn
Row 6- Make 1 SC, and 1 DC in the stitch above the DC from the previous row. Repeat all the way around until 1 stitch is left undone. Make 1 SC in that last stitch. Chain 1, TURN. Repeat row 6 until the mug cozy is the desired height of your cup (about 5 for a normal size mug)
Row 7- Sc around top to beginning. Sl 4 and join to opposite side. Sc around the opening to complete. Sl and tie off. (please note that I did a ch8 in the gray one above. this is when I realized 4 would be more appropriate.)
These are starting to look decent so I'm going to show you how I make them. Keep in mind I've been agonizing over them all day today. I've made 10. And started more. Watched every video I could find and read every tutorial. It really isn't a difficult stitch. But its awkward at first. Crochet is all about muscle memory. ALL about it. Also I apologize for the background switch up. It took me a minute to realize the glare. Start with two colors. You can do one. I just like to look of two.
Make a Magic Circle. This was a pain in the ass until it clicked, now I use it for everything. You can also chain 4, join with a slip stitch, and do 6 single crochet in the hole and start with the second color. If you wanna do the majestic magic circle try this.
Pull the yarn through, not a SC (Single Crochet) yet.
Now 5 SC (Single Crochet. The last loop on he yarn here is going to be the 6th loop for the petal. One SC per loop. So in theory, well, in practice really, you can make as many petals as you want, just make that many SC. If you need help with Single Croceht, try this one. ***PRO TIP*** Make that first SC a bit exaggerated It's hard to see and get in with you tighten the yarn. This will help.
Pull the yarn tight to pull the SCs together. This is where you are going to want the video linked above. (Keep trying!)
Join with the first SC.
This is a SL (Slip Stitch whenever you see "join" you are completing the circle with a slip stitch. Here you may be able to see the 6 ST (stitches) that will become the petals.
Here you are going to grab the yarn again, pull to through and cut it. You cut it off only if you are going to do another color. If you are continuing this color skip this step.
Pull it tight. You will be crocheting into this loop and don't want it to pull more than the rest. That will warp the petal.
Ok, now you need to add the next color. Insert your hook at the ST before the tie you just made. Put your yarn on the hook and pull it through. This might help. Skip to a minute.
When you have it through, chain (CH) 3. This is going to be the height of your petal. You can vary this a bit. Some people are tight crocheters, some are loose. It's just want is natural for you. When working in a round I'm tight. I apologize if the three chains are difficult to see here.
Yarn Over (YO).
Insert the hook into the SAME SC ST (don't forget your vocab! This is Single Crochet Stitch, this is what you made when you did the magic circle. You remember, each one is a petal.)
- Different View - Same Directions -
Pull through. Pull up with your hook so that the three loops you have on your hook is the same length. This will help create space you will need later and keep the height of the petal consistent.
Do this YO (Yarn Over) and pull through 4 times. This will give you nine loops on your hook. You can do more or less depending on how full you want your petal to be. It's your call. 9 seemed good to me, that when the SC ST started getting tight. When it does start getting tight there is nothing wrong with pulling the circle to stretch it a bit. It will spring back.
YO....
And pull through all 9 loops. This is going to take you a couple tries. The more consistent the height is, the easier this will be. A couple pics up when we started this step. That's what I was saying. :)
Tug it a bit to bunch the loops up a little and CH 3. Some patterns will tell you to SL (Slip Stitch) one and chain 2 but really you're chaining 3 so, yah. Do that.
Now this is important. This is what I was weirding out about. Take that and go back into THE SAME HOLE. The same one.
Pull through....
And chain 3. (SL and CH2) ***PRO TIP*** The difference in a chain and a slip stitch is really where you are in the pattern. If you are going into a ST its a slip. If you aren't and you are just grabbing the yarn and pulling it through itself, then it's a CH.
YO and insert your hook INTO THE NEXT SC ST. This begins your next petal. * Repeat all steps 5 more times.
At this point is when I cut these. I stitch around them for one petal and get rid of em. Some people keep them the whole time to secure them. I figure they are secure. The likelihood of this coming undone from those tails is like ... like ... someone giving me a time machine so I can go back to 1945 to pick up some dresses and get a hair cut. Not bloody likely.
FF>> Alllllright. Good job getting to here! Now, you are back at the top of the 6th petal. You are going to do the same...
CH 3 and connect with a SL to the same SC ST.
The difference here is that you are going to pull it up and cut the string. I tend to cut the tail part. I'm keeping a long string because I'm using it to sew the flowers together later.
Pull it TIGHT and in the direction of the center. This will keep it close to the middle to make it look more complete and secure.
Pull on the side that you have designated as the "wrong" side. The side that won't be seen. My "wrong" side is the flatter one. I want the puff to be the visible part.
Aaaaand done.
I kind of love them. :) The Official Pattern Color 1 - Row 1 - Magic Circle, SC 5, SL to join Color 2 - Row 2 - Chain 3, YO, through SC ST, YO* Repeat 4x, Pull through loop, CH 3, through ST, SL, CH 2, YO through next SC ST * Repeat 6 times. Last SC SL complete with SL. (All those pics for THAT.)
.jpg)

.jpg)